The process of constructing a granny flat is lengthy and involved, including plans, approvals, site preparation, the procurement of materials, and the installation of necessary infrastructure. Granny flat construction is similar to home construction in that it involves a lot of planning, decision-making, and documentation.
How Do You Get Started On Constructing A Granny Flat?
Getting the granny flat's blueprints approved is the initial step in construction. To create the structure, the builders will follow your plan, which details all the amenities you want to have in your granny flat.
Choose between a ready-made template or one of your creations. Usually, premade designs have already been drawn and given the go-light. Original blueprints are made up and submitted to the city council for review. It's important to keep in mind, though, that even ready-made designs can be modified to suit your needs. It's a common practice used to broaden the market for granny flats.
You get a must if your design isn't strict to the rules. Problematic items are sent back for alterations. Consultation with a professional architect or designer can help make sure a design is safe and practical.
Professional architects and designers will be familiar with all applicable regulations and the types of designs that are more likely to be accepted. Your chosen builder normally handles the approval procedure and feature advice.
Before You Build A Granny Flat, What Steps Should You Take To Prepare The Land?
The site for a granny flat must be prepared by removing obstacles and levelling the ground. Site work describes this procedure. Excavation, or removing subsurface barriers from the site, is the initial stage of site work.
This can be accomplished with a compactor and a shovel in more straightforward scenarios. Operators of plants often need to resort to specialised machinery and equipment when faced with challenging conditions.
Trees, rocks, and concrete too high off the ground must be removed. Subterranean impediments, such as buried plumbing, electrical lines, and septic tanks, require excavation before removal.
Filling and levelling the earth is the next step after excavation. Compacted layers of dirt, gravel, and sand measuring 300 millimetres thick fill in holes left by the excavation and level out sunken buildings like old swimming pools. This guarantees that the area is level and can accommodate a sand pad. A sand pad is an allotted space where the foundation will go. It is created by spreading sand across the ground and compacting it into a uniform layer.
The compacted sand pad's depth and density mostly depend on the soil type. Loam and other similarly firm soils are ideal. Their use strengthens the foundation of a granny flat.
The thickness and density of the sand pad are, therefore, reduced. However, sloped locations may need extra support regardless of the soil type. Extra concrete formwork or retaining walls are commonly installed to improve stability.
What's The Granny Flat Building Process?
After the initial preparation of the land is finished, the construction of a granny flat can begin. The granny flat is built in stages, adding an essential new layer to the overall structure. There are five distinct phases of construction: foundation, framework, locking up, and finishing.
Base Stage
The foundation phase of constructing a granny flat includes laying the pipework and concrete slab. Before pouring the concrete slab, a plumber installs plumbing piping.
After compacting the sand pad, the concrete may be poured into place. The structure was built with this. Due to its longevity, thermal efficiency, and low maintenance requirements, concrete is frequently utilised for basement floors.
Steel-frame stumped floors can replace concrete slabs on steep slopes. This base style is designed to last and features full insulation for maximum comfort.
Frame Stage
The framework of the granny flat is built during this phase. A building's walls, interior walls, and roof all form within a frame. Granny flat frames are often made of wood or steel.
Steel is preferable to wood because of its superior strength-to-weight ratio and higher resilience to heat and flames. Steel is also impervious to the ravages of termites, rot, swelling, splitting, and warping. Steel frames are more expensive to purchase, but they endure much longer and are rarely replaced.
Depending on the construction site's accessibility, prefabricated frames can be assembled. Easy access lets you deliver and assemble wall and roof frameworks. It is possible to obtain a similar result by framing together individual steel studs in situations where this is impossible.
Lockup Stage
In the lockup phase, the exterior of the granny flat is put in place. External cladding, corbelling, doors, windows, and thermal break insulation are all added to the framed walls.
In the meantime, the roof framing is insulated with roof sheets. Preliminary lines for utilities are drawn in the inside walls after the outside has been installed. These determine the placement of pipes and electrical wiring in the building.
Fixing Stage
The utilities and interior cladding of a granny flat are installed during the fixing phase of construction. Tradespeople install pipes, cables, batt insulation, and other utilities behind the walls.
Plasterboard, commonly known as gyprock, is used to finish the walls. Architraves and reveals are added to the inside of the windows. Skirting, Cabinets, and benchtops are also installed in the appropriate locations of the granny flat as part of the internal cladding. Waterproofing and tiling are installed in the home's wet spaces, such as the kitchen and bathrooms.
Completion
The final phase of developing a granny flat involves putting the finishing touches on the structure. The appropriate plumbing, electrical outlets, and locks are put in place.
The outside of the granny flat, including the walls and ceiling, is also painted. Flooring options include sanding wood and installing vinyl, carpets, tiles, etc. Stormwater is channelled away from your home into soak wells, drains, and downspouts. White ant treatment is then done around the granny flat's exterior.
The Granny Flat Cladding's Building Materials
Cladding for granny flats can be made from several different construction materials. The term "cladding" describes the exterior covering of a granny flat. Cladding materials can be chosen to complement a variety of aesthetic goals. The exterior walls of a granny apartment are often coated in wood, fibre cement, or steel.
Fibre Cement
Cladding granny flats with fibre cement is common since it is long-lasting and cost-effective. Cement with cellulose fibres added for reinforcement makes up this product. Boards and sheets of fibre cement are produced for a straightforward set-up. It can withstand the elements well, requires little upkeep, insulates extremely well, and has a long lifespan. In terms of aesthetics, it is available in various hues and designs to match any home's preexisting decor.
Wood
Cladding your wood home is quite on trend right now. Wood's natural beauty is prized by many, which means it can add value to a home. Wood is a natural, renewable, and inexpensive construction material.
Wood has less durability and resistance to fire than other materials. Wooden structures also decay more quickly and need constant upkeep.
Steel
Cladding for granny flats often consists of steel. It's weatherproof and easy to maintain. Steel can withstand high temperatures and humidity without damage, making it ideal for residential construction.
Steel's malleability increases its usefulness as a construction material and makes it more susceptible to dents. Steel cladding can also make a lot of noise when it rains heavily. Steel's hefty weight and price tag come hand in hand with its impressive durability.
Building A Granny Flat: How Long Does It Take?
Construction time for a granny apartment is usually between 12 and 16 weeks. However, if you factor in time for planning and obtaining necessary permissions, the whole thing may take seven to nine months. The duration of construction is unpredictable and is affected by factors like design, planning, and delays.
Approvals
To receive planning approvals, the design must adhere to all applicable codes and guidelines. The size of granny flats, setbacks, and effluent systems must be considered during design.
The Residential Design Codes do not preclude the possibility of obtaining clearance for design changes. However, the approval process is lengthy and involved. It can take longer for approvals to be processed by certain councils.
Designs
Its plan determines the layout and construction materials of a granny flat. Building a bigger granny flat takes more time and resources than a smaller one. The methods required to set up various materials vary.
Wood could be marginally quicker than steel. Design elements like slanted ceilings or a mezzanine level add extra time to the construction process because of their complexity.
Lastly, installing some appliances might add time to the construction schedule if supplies are scarce.
Delays
Delays occur when plans aren't well executed or when problems arise. When it rains, various building procedures must be put on hold, which causes construction delays.
Public holidays, especially during Christmas, have a discernible impact on construction timelines. Construction will be delayed in a fire-restricted area when there is a heightened fire risk.
Road construction in the region may prevent access to your construction site, delaying the installation of utilities. Any major alterations mid-construction would necessitate a new submission for approval, adding further time to the construction schedule.
How To Build Your Dream Granny Flat
A granny flat addition may do wonders for your home's resale value and provide much-needed extra space for your loved ones. However, where to start? This manual is designed to help you construct your ideal granny flat with the assistance of industry experts.
Determine What You Need, Then Determine Your Financial Limits
A concrete reason for wanting a granny flat will help determine how much money you can allocate towards the project. We'll provide you with a rough estimate of the price and some tailored design advice right here.
Find Out What The Rules Are In Your Area.
Local jurisdictions have varying requirements for granny flats. Ensure you're familiar with local regulations regarding Granny Flats before beginning construction.
Design Your Granny Flat
Your granny flat takes on form during the preparation phase. Consider the square footage of the kitchen, living room, and bedrooms.
Ensure That You Employ The Appropriate Contractors
You need to bring in the professionals when you have a plan. To locate local experts, just Google "Exterior Remodelling Contractors Near Me" or "Construction Contractors Near Me." Hiring a crew with prior experience in constructing granny flats is crucial.
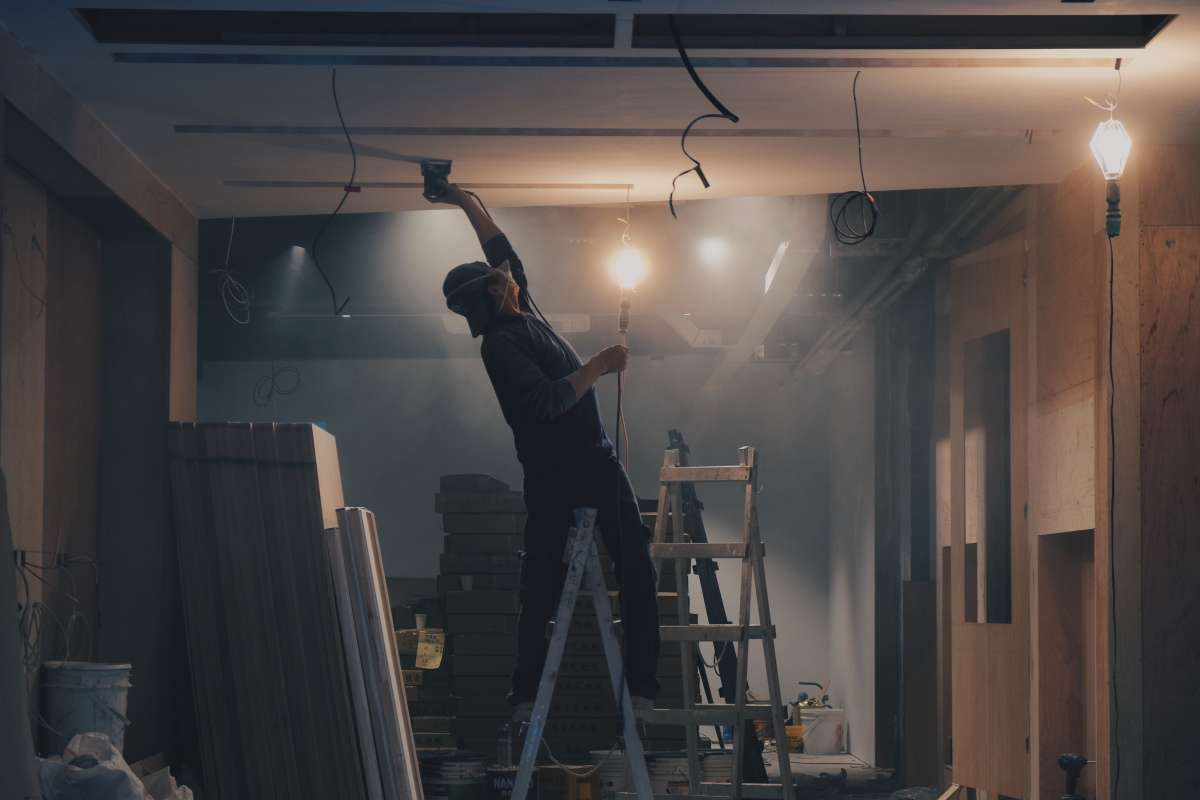
Construction Phase
During construction, your ideal granny flat materialises. Your prefered contractor will handle every step of the process, from site preparation to construction to quality control, on your behalf. Always go with a firm that has made a name for itself in New Home Construction.
Construction Completion, Inside And Out
Putting the finishing touches on your granny flat is the final phase. This can read "Kitchen Remodelling Carlsbad" or "Bathroom Remodelling Near Me." To make the exterior of your granny flat look as good as the interior, you may want to consider "Landscaping" services.
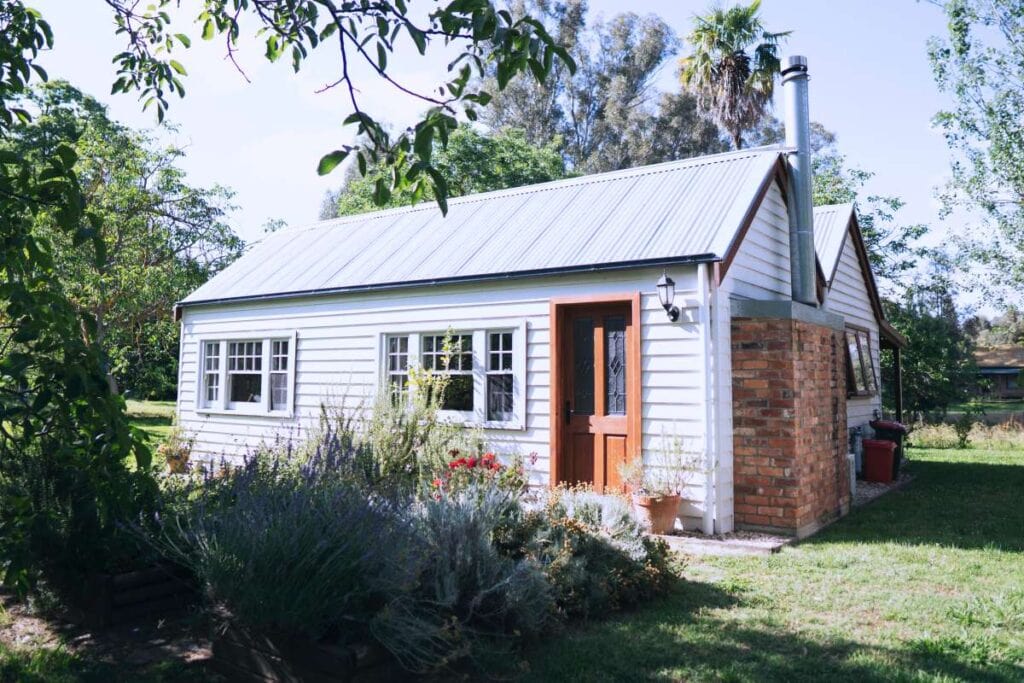
Have Fun With Your New Home.
Once construction and finishing are complete, the granny flat can be moved into. Whether you use it as a rental unit, a place for a loved one to reside, or a guest house, your new granny flat will be a great investment.
Conclusion
The construction of a granny flat is a complex process that involves planning, approvals, site preparation, material procurement, and infrastructure installation. It is similar to home construction in that it involves a lot of planning, decision-making, and documentation. The initial step in construction is getting the granny flat's blueprints approved, which details all the amenities you want in the structure. You can choose between a ready-made template or one of your creations.
The first step in construction is preparing the land by removing obstacles and levelling the ground. Excavation is the initial stage, which can be accomplished with a compactor and a shovel in more straightforward scenarios. Subterranean impediments, such as buried plumbing, electrical lines, and septic tanks, require excavation before removal. Compacted layers of dirt, gravel, and sand are then filled and levelled to ensure the area is level and can accommodate a sand pad.
The foundation phase of constructing a granny flat includes laying the pipework and concrete slab. Concrete is often used for basement floors due to its longevity, thermal efficiency, and low maintenance requirements. Steel-frame stumped floors can replace concrete slabs on steep slopes, offering full insulation for maximum comfort.
The framework phase of constructing a granny flat is built during this phase, with walls, interior walls, and roof all forming within a frame. Granny flat frames are often made of wood or steel, with steel being preferred due to its superior strength-to-weight ratio and higher resilience to heat and flames. Prefabricated frames can be assembled depending on the construction site's accessibility, or individual steel studs can be framing together in situations where this is impossible.
In the lockup phase, the exterior of the granny flat is put in place, with external cladding, corbelling, doors, windows, and thermal break insulation added to the framed walls. Roof framing is insulated with roof sheets, and preliminary lines for utilities are drawn in the inside walls after the outside has been installed.
The fixing phase of construction involves installing utilities and interior cladding, such as pipes, cables, batt insulation, and other utilities behind the walls. Gyprock, also known as gyprock, is used to finish the walls, and architraves and reveals are added to the inside of the windows. Skirting, cabinets, and benchtops are also installed in the appropriate locations of the granny flat as part of the internal cladding. Waterproofing and tiling are installed in the home's wet spaces, such as the kitchen and bathrooms.
The final phase of developing a granny flat involves putting the finishing touches on the structure, including plumbing, electrical outlets, and locks. The exterior of the granny flat is painted, and flooring options include sanding wood and installing vinyl, carpets, tiles, etc. Stormwater is channelled away from the home into soak wells, drains, and downspouts. White ant treatment is then done around the granny flat's exterior.
Cladding for granny flats can be made from several different construction materials, such as wood, fibre cement, or steel. Fiber cement is common due to its long-lasting and cost-effective nature, while wood is a natural, renewable, and inexpensive construction material. Steel is weatherproof and easy to maintain, making it ideal for residential construction. However, it can make a lot of noise when it rains heavily.
Construction time for a granny apartment is usually between 12 and 16 weeks, but if planning and obtaining necessary permissions, the whole thing may take seven to nine months. The duration of construction is unpredictable and affected by factors like design, planning, and delays. Approvals are required for the design to adhere to all applicable codes and guidelines, and the Residential Design Codes do not preclude the possibility of obtaining clearance for design changes.
Designs determine the layout and construction materials of a granny flat, with larger buildings taking more time and resources than smaller ones. Design elements like slanted ceilings or a mezzanine level add extra time to the construction process due to their complexity.
Delays occur when plans aren't well executed or when problems arise. Public holidays, especially during Christmas, have a discernible impact on construction timelines. Construction will be delayed in fire-restricted areas when there is a heightened fire risk. Road construction in the region may prevent access to the construction site, delaying the installation of utilities. Any major alterations mid-construction would necessitate a new submission for approval, adding further time to the construction schedule.
To build your dream granny flat, start by determining what you need and then determining your financial limits. Find out what the rules are in your area and ensure you are familiar with local regulations regarding granny flats before beginning construction.
Design your granny flat during the preparation phase, considering the square footage of the kitchen, living room, and bedrooms. Ensure that you employ the appropriate contractors, hiring a crew with prior experience in constructing granny flats.
During construction, your ideal granny flat materializes, with your preferred contractor handling every step of the process. Consider landscaping services to make the exterior look as good as the interior. Once construction and finishing are complete, your new granny flat can be moved into as a rental unit, a place for a loved one to reside, or a guest house.
Content Summary:
- The process of constructing a granny flat is lengthy and involved, including plans, approvals, site preparation, the procurement of materials, and the installation of necessary infrastructure.
- Getting the granny flat's blueprints approved is the initial step in construction.
- To create the structure, the builders will follow your plan, which details all the amenities you want to have in your granny flat.
- Choose between a ready-made template or one of your creations.
- You get a must if your design isn't strict to the rules.
- Consultation with a professional architect or designer can help make sure a design is safe and practical.
- The site for a granny flat must be prepared by removing obstacles and levelling the ground.
- Excavation, or removing subsurface barriers from the site, is the initial stage of site work.
- The compacted sand pad's depth and density mostly depend on the soil type.
- Their use strengthens the foundation of a granny flat.
- The thickness and density of the sand pad are, therefore, reduced.
- However, sloped locations may need extra support regardless of the soil type.
- After the initial preparation of the land is finished, the construction of a granny flat can begin.
- The granny flat is built in stages, adding an essential new layer to the overall structure.
- The foundation phase of constructing a granny flat includes laying the pipework and concrete slab.
- After compacting the sand pad, the concrete may be poured into place.
- The framework of the granny flat is built during this phase.
- Granny flat frames are often made of wood or steel.
- The utilities and interior cladding of a granny flat are installed during the fixing phase of construction.
- Skirting, Cabinets, and benchtops are also installed in the appropriate locations of the granny flat as part of the internal cladding.
- The final phase of developing a granny flat involves putting the finishing touches on the structure.
- The outside of the granny flat, including the walls and ceiling, is also painted.
- Cladding for granny flats can be made from several different construction materials.
- The term "cladding" describes the exterior covering of a granny flat.
- Cladding materials can be chosen to complement a variety of aesthetic goals.
- The exterior walls of a granny apartment are often coated in wood, fibre cement, or steel.
- Steel's malleability increases its usefulness as a construction material and makes it more susceptible to dents.
- Construction time for a granny apartment is usually between 12 and 16 weeks.
- However, if you factor in time for planning and obtaining necessary permissions, the whole thing may take seven to nine months.
- The duration of construction is unpredictable and is affected by factors like design, planning, and delays.
- Designs Its plan determines the layout and construction materials of a granny flat.
- Building a bigger granny flat takes more time and resources than a smaller one.
- Road construction in the region may prevent access to your construction site, delaying the installation of utilities.
- Any major alterations mid-construction would necessitate a new submission for approval, adding further time to the construction schedule.
- We'll provide you with a rough estimate of the price and some tailored design advice right here.
- Ensure you're familiar with local regulations regarding Granny Flats before beginning construction.
- Your granny flat takes on form during the preparation phase.
- Hiring a crew with prior experience in constructing granny flats is crucial.
- During construction, your ideal granny flat materialises.
- Your prefered contractor will handle every step of the process, from site preparation to construction to quality control, on your behalf.
- Putting the finishing touches on your granny flat is the final phase.
- To make the exterior of your granny flat look as good as the interior, you may want to consider "Landscaping" services.
- Once construction and finishing are complete, the granny flat can be moved into.
- Whether you use it as a rental unit, a place for a loved one to reside, or a guest house, your new granny flat will be a great investment.
FAQs About Granny Flats
The construction timeline depends on factors such as the size and complexity of the granny flat, weather conditions, and the availability of labour and materials. On average, it can take several months.
Look for licensed and experienced builders with a track record of constructing granny flats. Request references and check their reputation and credentials.
Yes, building inspectors will conduct inspections at various stages of construction to ensure that the work meets safety and building standards.
Create a detailed budget that includes all expenses, from design and permits to construction and finishing. Be prepared for unexpected costs by setting aside a contingency fund.
After construction, you can move in or rent out the granny flat. Make sure to finalise any remaining paperwork, such as occupancy permits, and address any post-construction maintenance or adjustments as needed.